About Me

My name is Christine. I'm a visual artist, musician, traditional storyteller, DV survivor, and have been a fulltime caregiver for an individual living with various diagnoses. After my marriage, I learned how to play various instruments, started exploring various means of creative expression, worked with at-risk teens/families, volunteered with the local crisis lines, participated in starting up a family resource center, completed my BA, furthered my studies towards becoming an art therapist, managed homes for adults living with disabilities, and facilitated therapeutic music/art sessions. I was doing everything I could so my children and I could have a brighter life, present and future. My physical health, however, continued to show evidence of too many chronic stressors over many decades. This blog is about my journey in discovering peace and better health by meeting life in the most basic and, in my opinion, the most rewarding of ways - by focusing on the riches of simplicity. If you're a new visitor to my blog, you might be interested in starting here: Finding the Riches.

Saturday, January 21, 2012

Easy and Divine!

I have a new favourite drinking milk - homemade coconut milk! It's so very delicious and inexpensive and has tons of nutritional benefits. My first experiment was done by filling a medium saucepan about 3/4 full of water (sorry for the "of water" omission in today's first post, thanks S!), adding three handfuls (handsful?) of shredded coconut and heating them (I boiled the first time but was concerned about loss of nutrients) together for about 5 minutes. Once the mixture was cooled enough, I poured it into a blender and ran the blender for about a minute then strained the mixture through a fine sieve (and pressing the fleshy bits) before pouring into a container to be refrigerated. I also drank about half a cup of it before putting it into the fridge. It was wonderful and creamy and absolutely delicious. The next morning I was delighted to find the cold version was not only equally delicious but very refreshing. I immediately made another batch, this time adding it to the blender while it was still as warm as I thought my blender could tolerate, then added cinnamon - definitely a new favourite in the warm beverage category! My next experiment was to just soak shredded coconut in an equal amount of hot water for 5 minutes then pour it through the sieve and press the flesh. This provided a very nice milk as well, though I still preferred the creaminess result of boiling/blending over this one.

One of the benefits I appreciate most from our homemade nut milks (almond, walnut, and now coconut!) in addition to that wonderfully therapeutic feel of working with food, is always being able to make some as long as I have nuts in the cupboard. I've never done a price comparison of homemade nut milk vs dairy milk for a family of 4, but the homemade nut milk is definitely less costly than commercially-prepared nut milks and has that additional benefit of the lovely feeling that comes from peparing it myself.

The nut milks we make generally follow the same recipe - soak the nuts overnight, rinse well, put nuts into blender and add more or less twice as much water to nuts, blend for a few minutes, strain, store in refrigerator. Some folks would add vanilla and/or sweetener. The remaining nut "mash" or pulp can be re-used for another batch of (thinner) milk, used with other foods or just eaten on its own - lovely with honey.

There are benefits to soaking the (plain, unsalted) nuts beforehand, though you can also just use them without soaking. (***for those interested in nutritional information, read up on the importance of soaking nuts and the connection to phytic acid)

The water/nut ratio depends on your taste as well as how you'll be using the nut milk. I prefer a thicker milk for gravies/sauces/puddings, and somewhat thinner for drinking.

Well, I must be off - there's a bottle of coconut milk that's been cooling since last night....
 

Tuesday, January 17, 2012

Natural Cleaning for Body and Home

I've recently had requests for information about "simple" cleaning products. It feels so good to be free from purchasing commercial cleaners and having them in our home. It feels great to know my cleaning products aren't doing more harm to the environment, and that they're not having a negative effect on my health nor the health of my family. And - the cost is pennies compared to commercial products. It just feels good!

There's a myriad of information online about natural cleaning for home and body so I won't go into detail other than sharing my own experience.

I believe "cleaning" our body is more about "feeding" our body's exterior. My aim is to promote health and well-being for my skin, which contributes to my overall health and well-being, and to do so within a tight budget. It doesn't take much at all, cost-wise, so it's a really lovely way to care for yourself.

Hair
The biggest lesson I've learned when it comes to my hair/scalp was to drop the "must wash daily" habit. It's terrible for the scalp, which is so much happier with its own oils. It took awhile for my hair to get used to the idea of being washed only once or twice a week, but once it got into a natural frame of mind, it was healthier and easier to manage. It's now at a point where it generally only needs a basic washing about once every 7-10 days.
For basic hair cleaning, I use baking soda, vinegar, and water, though mostly I just use vinegar and water. Sometimes I add baking soda to water and shake the mixture and massage it well all over my scalp then rinse with a vinegar/water blend. Other times I make a paste with some baking soda in my hand and a bit of water then massage that in and keep making more paste as needed. Usually I prefer to sprinkle baking soda onto my scalp, wet or dry, massage it well and then (because I just enjoy the fun of it!) squirt vinegar over my scalp (it's good to let the vinegar container sit in the warm water first unless you enjoy having cold liquid running/dripping down your back) and work my fingers through that lovely foaming action! I follow this with a thorough water rinse and sometimes do an additional vinegar/water rinse. Once or twice a month I use olive oil (only need a couple of tablespoons) and/or natural honey yoghurt for deep conditioning. I rinse thoroughly with water then usually do a brief wash with a bar of organic soap I keep for just this purpose followed by a vinegar/water rinse. Once in a blue moon I use a "clean" (organic, no animal testing, etc.) commercial shampoo after deep conditioning.

Bathing
For me, a basic bath is 1/2 - 1 cup vinegar poured into the bath water. Other than that, the sky's the limit. Olive oil (1 tablespoon is usually plenty, definitely no more than two), epsom salts, baking soda, orange peels, herbal teabag (lovely to squeeze over the skin), oatmeal in a bit of fabric tied with string (again, wonderful to squeeze/drip over skin) - any or all of the aforementioned (feel free to add fruit, milk (nut,goat,dairy,whatever floats your boat), natural juice, or any other natural tidbits you desire!) make for a healthy, natural experience for your body and soul. If I use a washcloth, I use a piece of felted wool (I'll soon have some for sale in my shop). If I don't use olive oil in my bath because I know I won't have time to clean it from the sides of the tub after bathing (empty/rinse tub, sprinkle baking soda either onto sides of tub or onto sponge and wipe, rinse), I'll put a couple drops at a time into my palm and massage that over my skin, occasionally adding a few drops of vanilla extract as well.

Face
I usually just use water in the morning. Before bed, I usually use a piece of felted wool (lovely benefits to using wool!) with vinegar to wipe off the bits of the day then sometimes rinse with water then smear a few drops of olive oil directly onto my skin as needed. Once in awhile I'll do a natural yoghurt mask which takes about 1-2 tablespoons of yoghurt to do my face and neck and hands - just smear it on as you would use a commercial skin cream, let it dry (or don't) and rinse off. Another option I sometimes use is a bit of oatmeal in a piece of tied fabrice - wet the bundle and squeeze the oatmeal "juice" into your palm then rub onto your skin. There are all sorts of other natural facial/bodycare options. I find that what I'm presently using presently works for my skin and my budget.

Scent
As we continue to move towards being a commercially scent-free society, there are natural ways to enhance your natural scent or to provide a scent for yourself to enjoy throughout the day. I enjoy the scent of vanilla, so occasionally I'll rub a couple of drops onto my hands or onto my neck or scarf so I can breathe it in wherever I am. A bit of olive oil in the background might help the scent linger longer.

Teeth
I wet my toothbrush then dip it straight into baking soda and brush then rinse with a water/vinegar combo. Flossing is important. Rinsing after flossing is important. Cleaning teeth before breakfast is important so any ick that may have accumulated throughout the night is not being swallowed. In summer, I usually keep a few fresh mint leaves with me to chew as needed throughout the day rather than commercial gum/breath freshener. Drinking mint water (water with fresh or dried mint leaves in a non-plastic/non-paper cup - I like popping some into my water bottle for mintry freshness throughout the day) is also beneficial for that fresh mouth feeling.
*Lately I've been reading about some interesting connections between honey and dental care, but I don't know enough about it to feel comfortable putting the information here. It's certainly interesting and research-worthy!

Household Cleaning
Baking Soda. Vinegar. Water.

Baking Soda: almost anywhere that needs scrubbing/polishing - stained cups, sinks/tub, toilet bowls, hard-water-stained faucets, refrigerator, etc. For small areas, I dip a fingertip of a wet rag into baking soda. Rinse, dry/polish if needed.

Vinegar: countertops, floors, sinks, tubs, toilets, windows, glass tables, etc. I try to keep a spray bottle with a water/vinegar mix for most uses and a small separate spray bottle with just vinegar for glass/faucets/mirrors. Just a little spray will do! I also put vinegar into the toilet bowl when it needs freshening.

Stovetop/Oven: Scrub with baking soda as needed. For tougher spots - when I've boiled the kettle for tea/cocao, I pour a bit of the boiling water onto what needs to be cleaned on the stovetop, place a dishcloth over it and let it soak then use baking soda and an old toothbrush.

Air/Fabric Freshener: Water/vinegar mixed and kept in a spray bottle - spray as needed. Also great for spraying directly into the toilet as needed after flushing.

Laundry: We use about half a cup of baking soda instead of laundry detergent. Sometimes we add a bit of vinegar as well. I am still working on finding what works best for static cling when using the dryer. For awhile, I tried those plastic (ugh, plastic!) balls that are meant to replace dryer sheets but they dimpled all my clothes every time. I've read that making felted wool dryer balls are the answer but I haven't tried them yet. **UPDATE: The last few weeks, I've been using just straight vinegar for washing my clothes - it's likely around a cupful that I pour in. Static cling is minimal at the most.

*************************
Well, that's all that's coming to mind off-hand. I'll add more if more comes to mind, but I'd love to hear your natural body/household solutions!

Wednesday, January 04, 2012

Upcycled Baby Skirts


Fairy/Pixie Skirt:
Wispy, angled points and soft elastic waist. Upcycled from a curtain.
 
I found an airy white curtain at the thrift shop, trimmed the edges into pixy wisps, slipped a soft elastic into the curtain rod sleeve, and stitched up the back. Very simple with only very basic cutting and sewing skills required.


Ballerina Fairy Skirt:
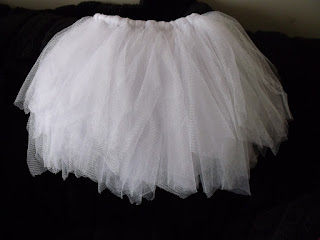
Layers of netting tied onto a soft elastic waist.
Upcycled from mosquito netting.
 
I found mosquito netting at our local thrift shop. I cut it into numerous strips of the same length then later decided to trim some of the lengths to add more dimension and bounce for a little ballerina, though having them all the same length was just as lovely. I hand-stitched the two ends of soft elastic together then simply tied the netting strips onto the elastic by creating a netting strip loop then pulling the ends through the loop so the netting hung on the elastic. I was surprised by how the elastic ended up being stretched by the process, and I ended up trimming and re-stitching the elastic. Due to the time it took to cut the strips, this skirt was much more labour-intensive than the one above.
Next to no sewing skills required.